


CI 및 Git Action이란
참고자료


1. Git Action 사전구성
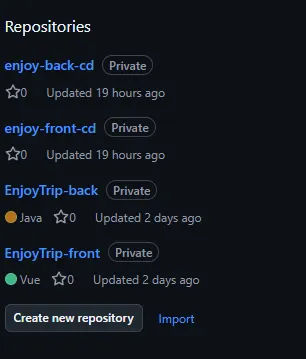
1) Git Repository 선정
우선 Git Action을 사용할 repository를 선택해야 하는데 현재 진행하는 프로젝트에서는
어플리케이션 소스가 들어간 repository, CI/CD 용 매니페스트가 들어간 repository로 나눈 후
각 repository를 Frontend, Backend 용으로 분할하여 총 4개의 repository를 구성한다.
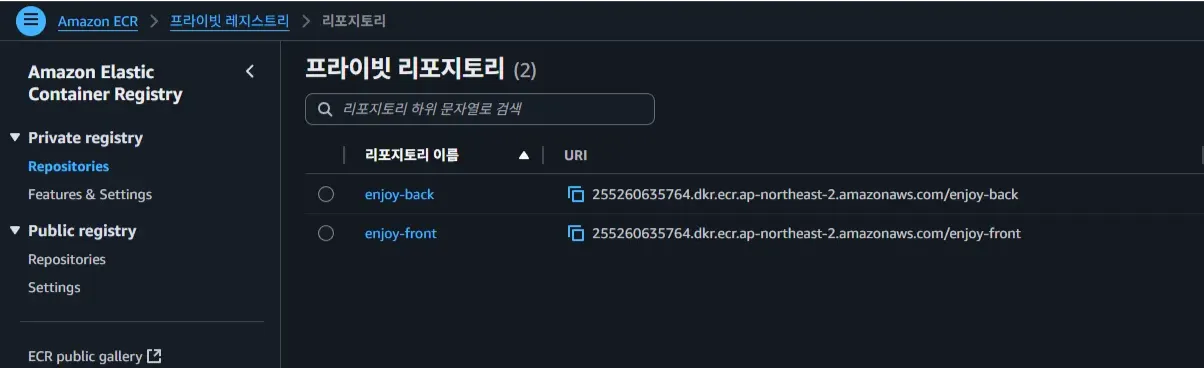
2) AWS ECR 생성
Frontend, Backend 각각 하나씩 만들어서 Git Action을 통해 빌드한 결과물을 해당하는 repository에 업로드한다.
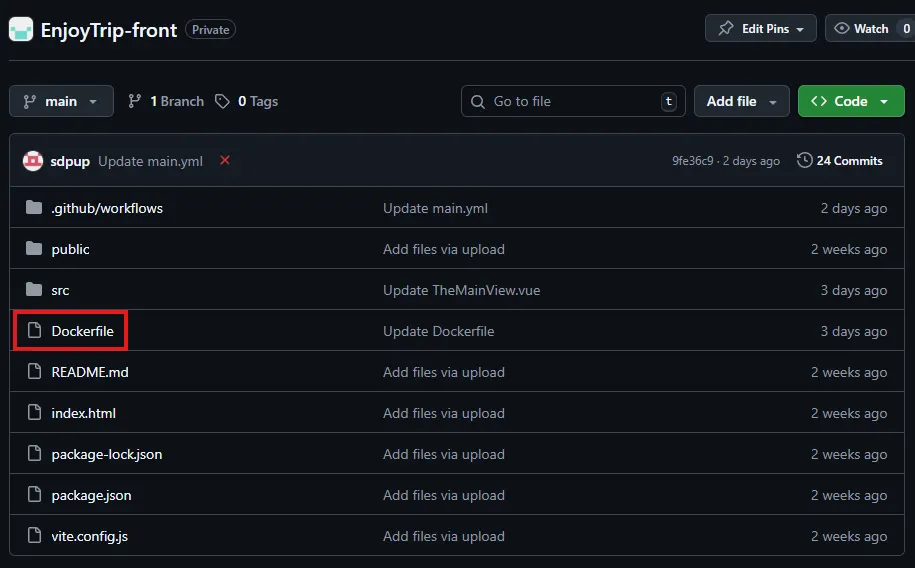
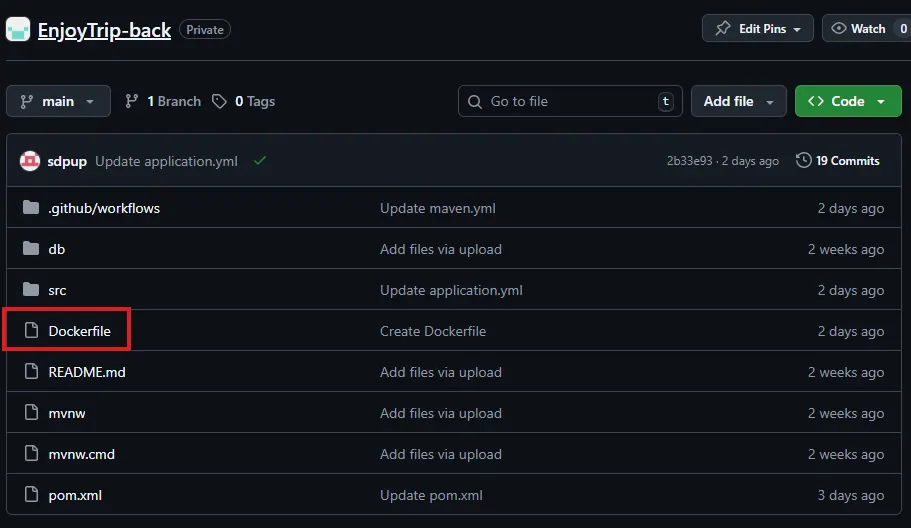
3) Dockerfile
프로젝트 소스를 이미지로 빌드하는 것이 목적이기 때문에 각 repository에 맞는 Dockerfile 생성 후
해당 repository에 넣어줘야 한다.
Frontend
# VUE
FROM node:18 AS build
WORKDIR /app
COPY package*.json ./
RUN npm install
COPY . .
RUN npm run build
# NGINX
FROM nginx:alpine
COPY /dist /usr/share/nginx/html
EXPOSE 80
CMD ["nginx", "-g", "daemon off;"]
Docker
복사
Backend
# JAR
FROM openjdk:17-jdk-slim
WORKDIR /app
COPY target/*.jar app.jar
EXPOSE 8080
ENTRYPOINT ["java","-jar","app.jar"]
Docker
복사
4) Secrets 등록
Git Action 에서 사용할 환경 변수 중 민감한 데이터들은 보안을 이유로 따로 등록해줘야 하는데 이를 지원하는 기능이 secrets이다.
repository 상단 메뉴 Settings - Secrets and variables - Action 탭에 가면 secrets를 등록할 수 있으며
secrets에 등록된 변수들은 언제든지 $ {{ secrets.* }} 를 통해서 호출하여 사용할 수 있다.
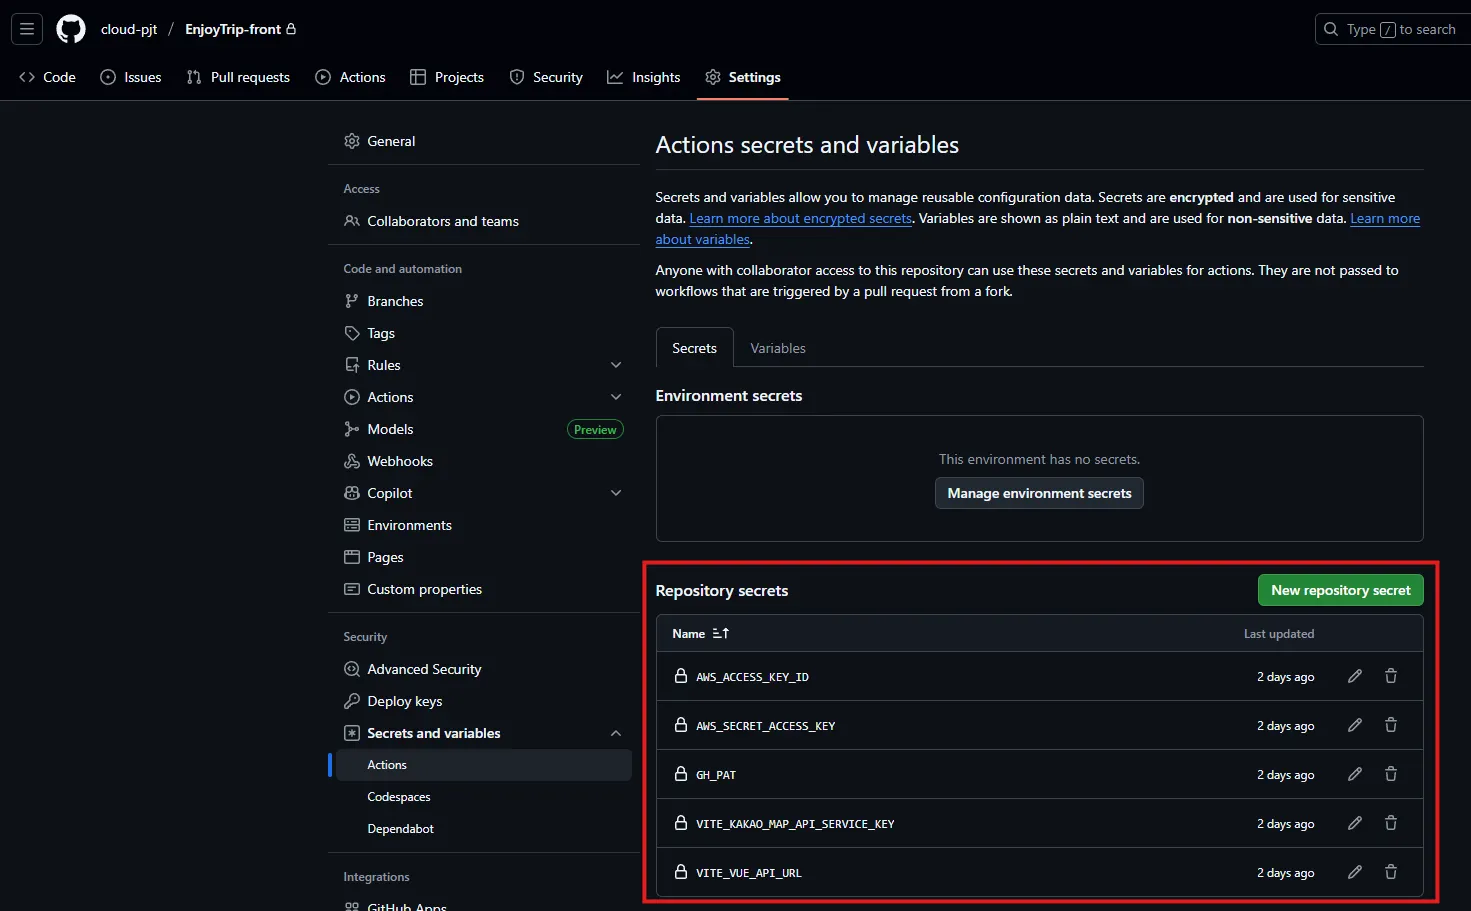
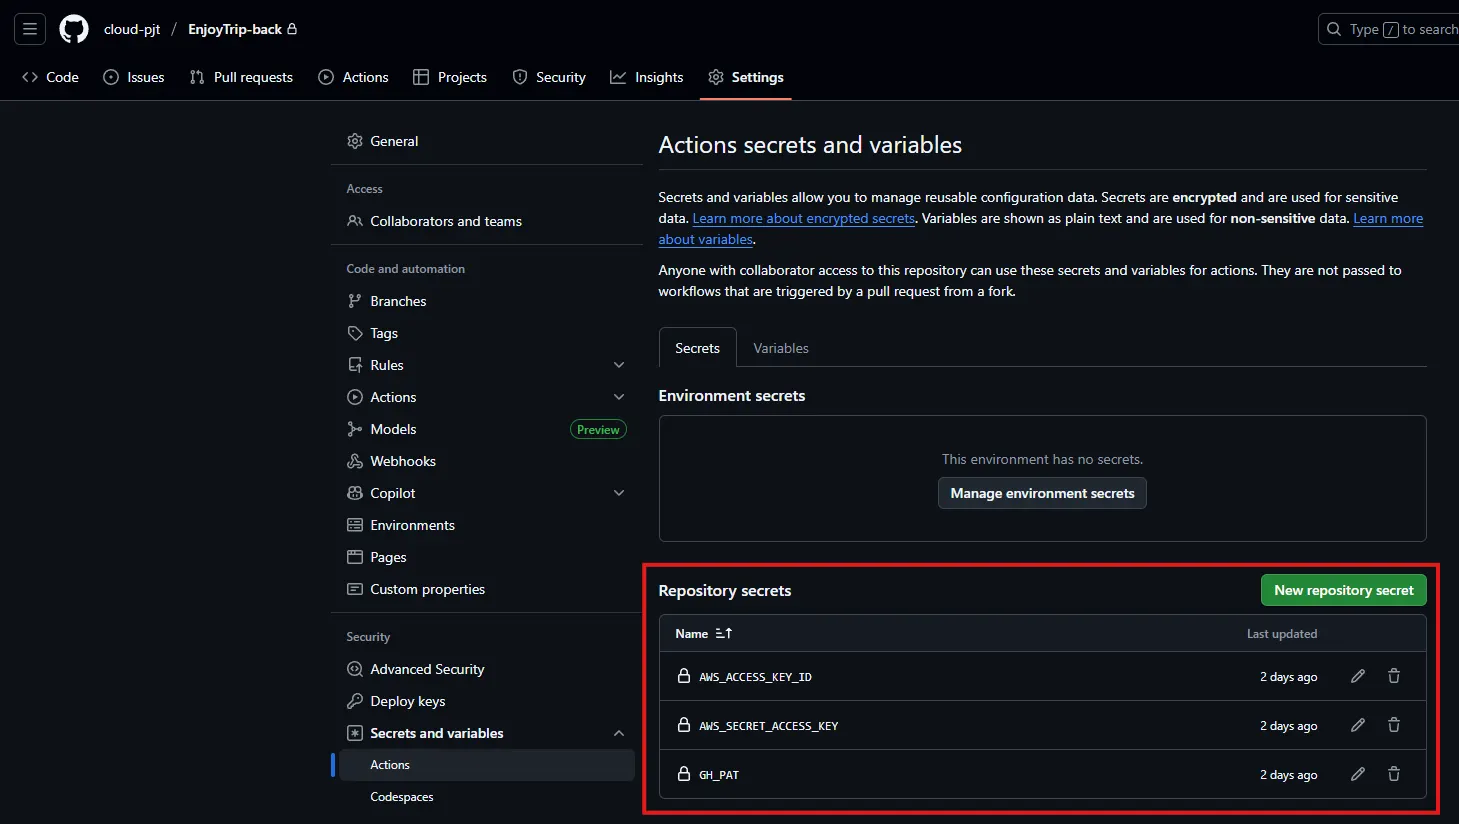
front와 back에 각각 사용할 secrets를 등록해준다.
2. workflow 구성
Repository - Actions 탭으로 가면 Git Action workflow 를 작성하고 실행할 수 있다.
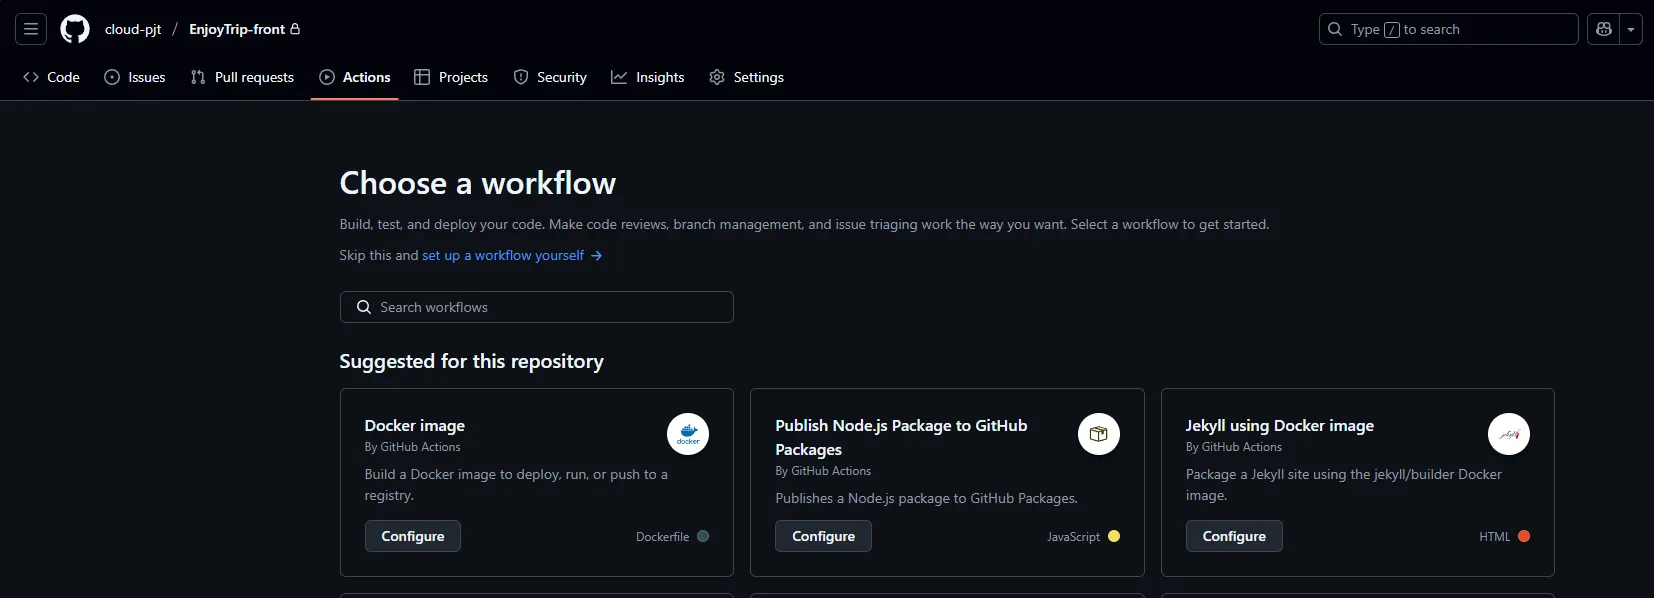
기본적으로 제공되는 template을 가져와서 만들 수도 있고 set up a workflow yourself 항목을 눌러서
처음부터 새로 만들 수도 있다.
이제 각 repository 별로 workflow 파일을 작성한다.
1) Frontend
name: Build and Push Vue Frontend to ECR
#branch 선택
on:
push:
branches: [ "main" ]
workflow_dispatch:
jobs:
build:
runs-on: ubuntu-latest
env:
ECR_REGISTRY: 255260635764.dkr.ecr.ap-northeast-2.amazonaws.com
ECR_REPOSITORY: enjoy-front
steps:
# 1. Checkout 코드
- name: Checkout source
uses: actions/checkout@v3
# 2. Node.js 환경 설정
- name: Setup Node.js
uses: actions/setup-node@v3
with:
node-version: '18'
# 3. Vue 빌드 (dist 생성)
- name: Install dependencies and build
run: |
echo "VITE_KAKAO_MAP_API_SERVICE_KEY=${{ secrets.VITE_KAKAO_MAP_API_SERVICE_KEY }}" >> .env
echo "VITE_VUE_API_URL=${{ secrets.VITE_VUE_API_URL }}" >> .env
npm install
npm run build
# 4. 시간태그
- name: Get current time
id: current-time
run: echo "formattedTime=$(date +'%Y%m%d-%H%M%S')" >> $GITHUB_OUTPUT
- name: Show Current Time
run: echo "Current time is ${{ steps.current-time.outputs.formattedTime }}"
# 5. AWS 로그인
- name: Configure AWS credentials
uses: aws-actions/configure-aws-credentials@v1
with:
aws-access-key-id: ${{ secrets.AWS_ACCESS_KEY_ID }}
aws-secret-access-key: ${{ secrets.AWS_SECRET_ACCESS_KEY }}
aws-region: ap-northeast-2
- name: Login to Amazon ECR
id: login-ecr
uses: aws-actions/amazon-ecr-login@v1
# 6. Docker 빌드 & Push
- name: Build, tag, and push image to Amazon ECR
run: |
docker build -t $ECR_REPOSITORY:${{ steps.current-time.outputs.formattedTime }} .
docker tag $ECR_REPOSITORY:${{ steps.current-time.outputs.formattedTime }} $ECR_REGISTRY/$ECR_REPOSITORY:${{ steps.current-time.outputs.formattedTime }}
docker push $ECR_REGISTRY/$ECR_REPOSITORY:${{ steps.current-time.outputs.formattedTime }}
# 7. Manifest
- name: Checkout manifests repo
uses: actions/checkout@v4
with:
repository: cloud-pjt/enjoy-front-cd
token: ${{ secrets.GH_PAT }}
# frontend repository로 가서 enjoy-back.yaml의 image: 부분을 현재 빌드하는 image로 교체
# frontend 폴더, enjoy-front.yaml 파일 사전 생성 필요
- name: Update frontend manifest
run: |
cd frontend
sed -i "s|^\(\s*image:\s*\).*|\1${ECR_REGISTRY}/${ECR_REPOSITORY}:${{ steps.current-time.outputs.formattedTime }}|" enjoy-front.yaml
- name: Commit and push
run: |
cd frontend
git config user.name "sdpup"
git config user.email "epflswu12@gmail.com"
if ! git diff --quiet; then
git commit -am "Update frontend image to ${{ steps.current-time.outputs.formattedTime }}"
git push
else
echo "No changes to commit."
fi
YAML
복사
2) Backend
name: Java CI with Maven
#branch 선택
on:
push:
branches: [ "main" ]
workflow_dispatch:
jobs:
build:
runs-on: ubuntu-latest
env:
ECR_REGISTRY: 255260635764.dkr.ecr.ap-northeast-2.amazonaws.com
ECR_REPOSITORY: enjoy-back
steps:
- uses: actions/checkout@v4
- name: Set up JDK 11
uses: actions/setup-java@v4
with:
java-version: '11'
distribution: 'temurin'
cache: maven
- name: Build with Maven
run: mvn -B package -DskipTests --file pom.xml
- name: Upload test reports
if: failure()
uses: actions/upload-artifact@v4
with:
name: surefire-reports
path: '**/target/surefire-reports/*'
# 4. 현재 시간 태그 (선택)
- name: Get current time
id: current-time
run: echo "formattedTime=$(date +'%Y%m%d-%H%M%S')" >> $GITHUB_OUTPUT
- name: Show Current Time
run: echo "Current time is ${{ steps.current-time.outputs.formattedTime }}"
# 5. AWS 로그인
- name: Configure AWS credentials
uses: aws-actions/configure-aws-credentials@v1
with:
aws-access-key-id: ${{ secrets.AWS_ACCESS_KEY_ID }}
aws-secret-access-key: ${{ secrets.AWS_SECRET_ACCESS_KEY }}
aws-region: ap-northeast-2
- name: Login to Amazon ECR
id: login-ecr
uses: aws-actions/amazon-ecr-login@v1
# 6. Docker 빌드 & Push
- name: Build, tag, and push image to Amazon ECR
run: |
docker build -t $ECR_REPOSITORY:${{ steps.current-time.outputs.formattedTime }} .
docker tag $ECR_REPOSITORY:${{ steps.current-time.outputs.formattedTime }} $ECR_REGISTRY/$ECR_REPOSITORY:${{ steps.current-time.outputs.formattedTime }}
docker push $ECR_REGISTRY/$ECR_REPOSITORY:${{ steps.current-time.outputs.formattedTime }}
- name: Checkout manifests repo
uses: actions/checkout@v4
with:
repository: cloud-pjt/enjoy-back-cd
token: ${{ secrets.GH_PAT }}
# backend repository로 가서 enjoy-back.yaml의 image: 부분을 현재 빌드하는 image로 교체
# backend 폴더, enjoy-back.yaml 파일 사전 생성 필요
- name: Update backend manifest
run: |
cd backend
sed -i "s|^\(\s*image:\s*\).*|\1${ECR_REGISTRY}/${ECR_REPOSITORY}:${{ steps.current-time.outputs.formattedTime }}|" enjoy-back.yaml
- name: Commit and push
run: |
cd backend
git config user.name "sdpup"
git config user.email "epflswu12@gmail.com"
if ! git diff --quiet; then
git commit -am "Update backend image to ${{ steps.current-time.outputs.formattedTime }}"
git push
else
echo "No changes to commit."
fi
YAML
복사
다음과 같이 구성한 후 우측 상단 Commit changes…를 클릭하면 해당 workflow가 실행된다.
3. 실행 결과 확인
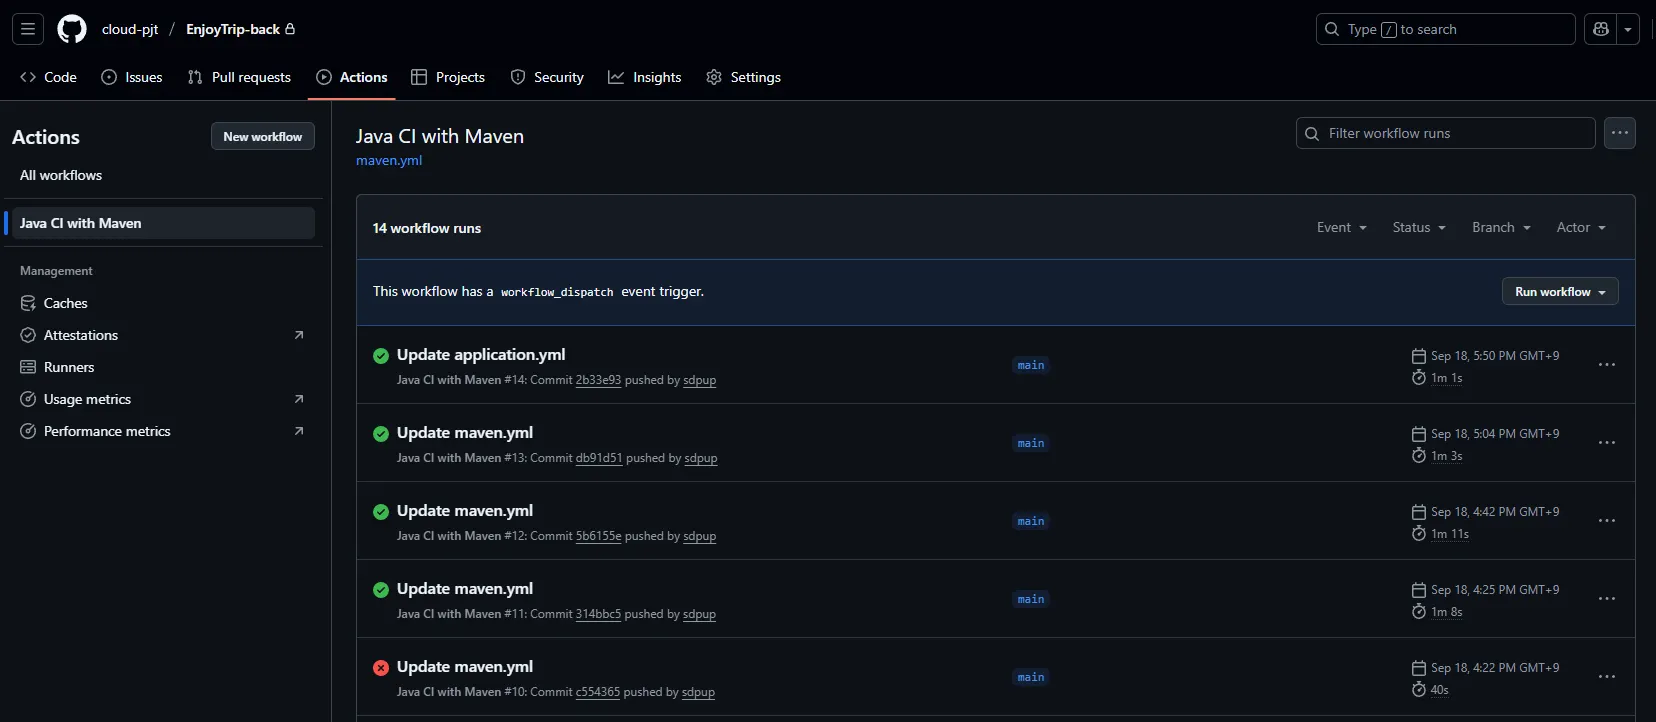
다시 Actions 탭에 들어가면 내가 생성한 workflow가 보이고 해당 workflow에서 실행되는 내용들을 확인할 수 있다.
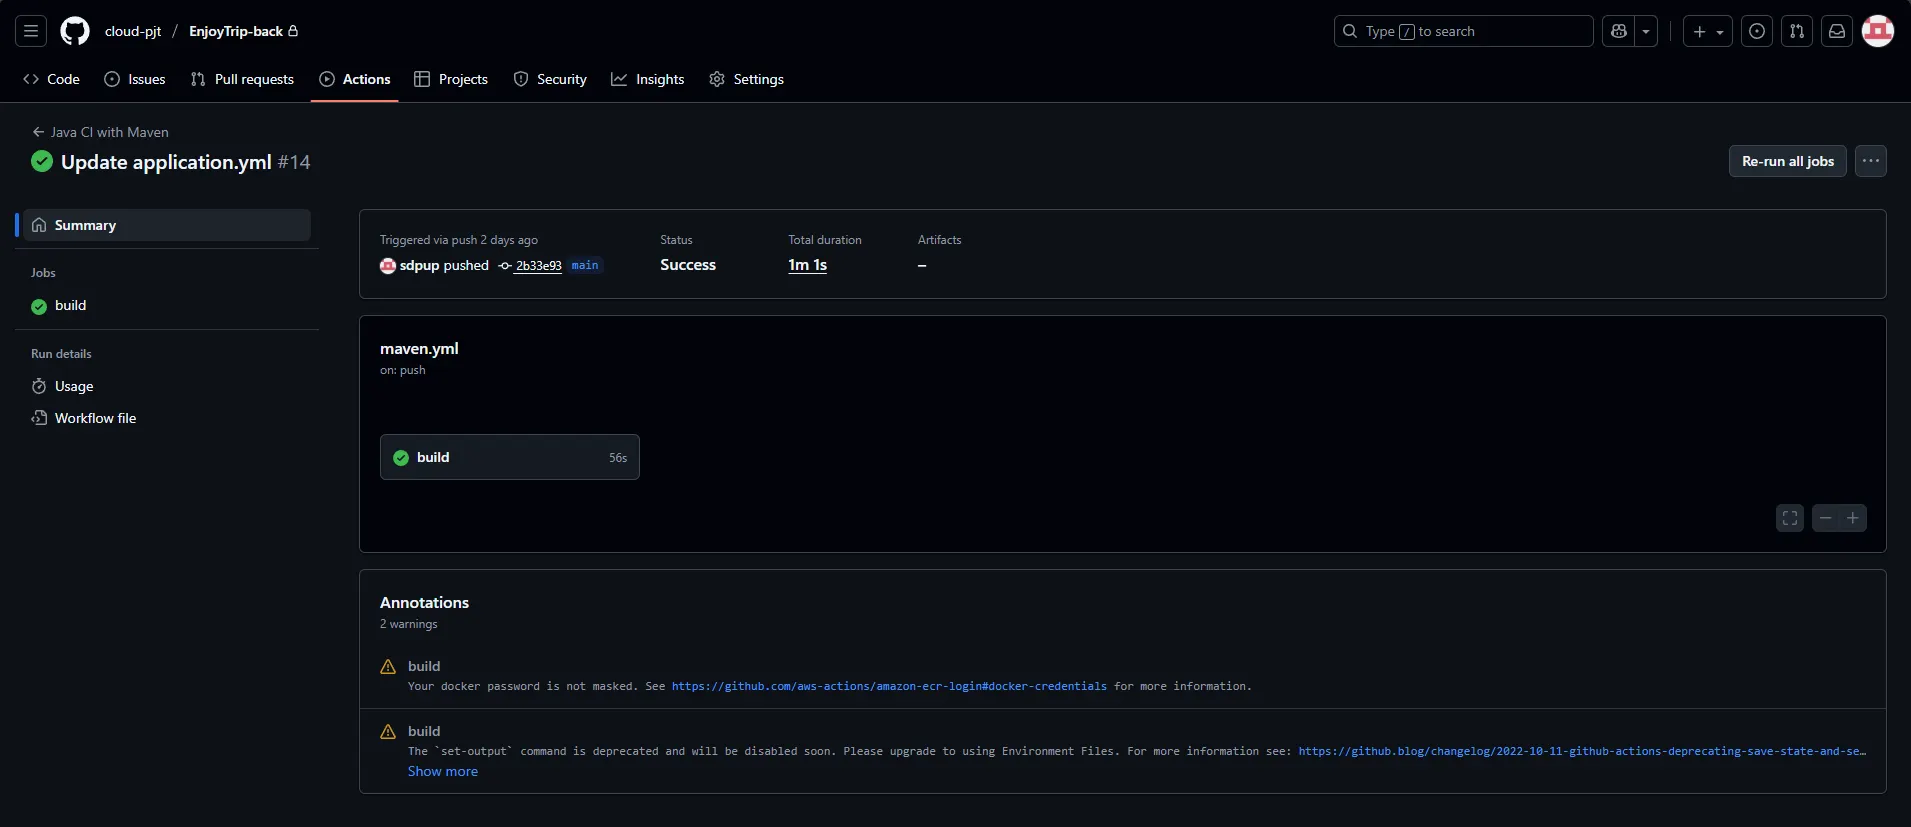
또한 원하는 작업 내역을 눌러보면 빌드 소요 시간과 결과, 알림 내용들을 확인할 수 있고
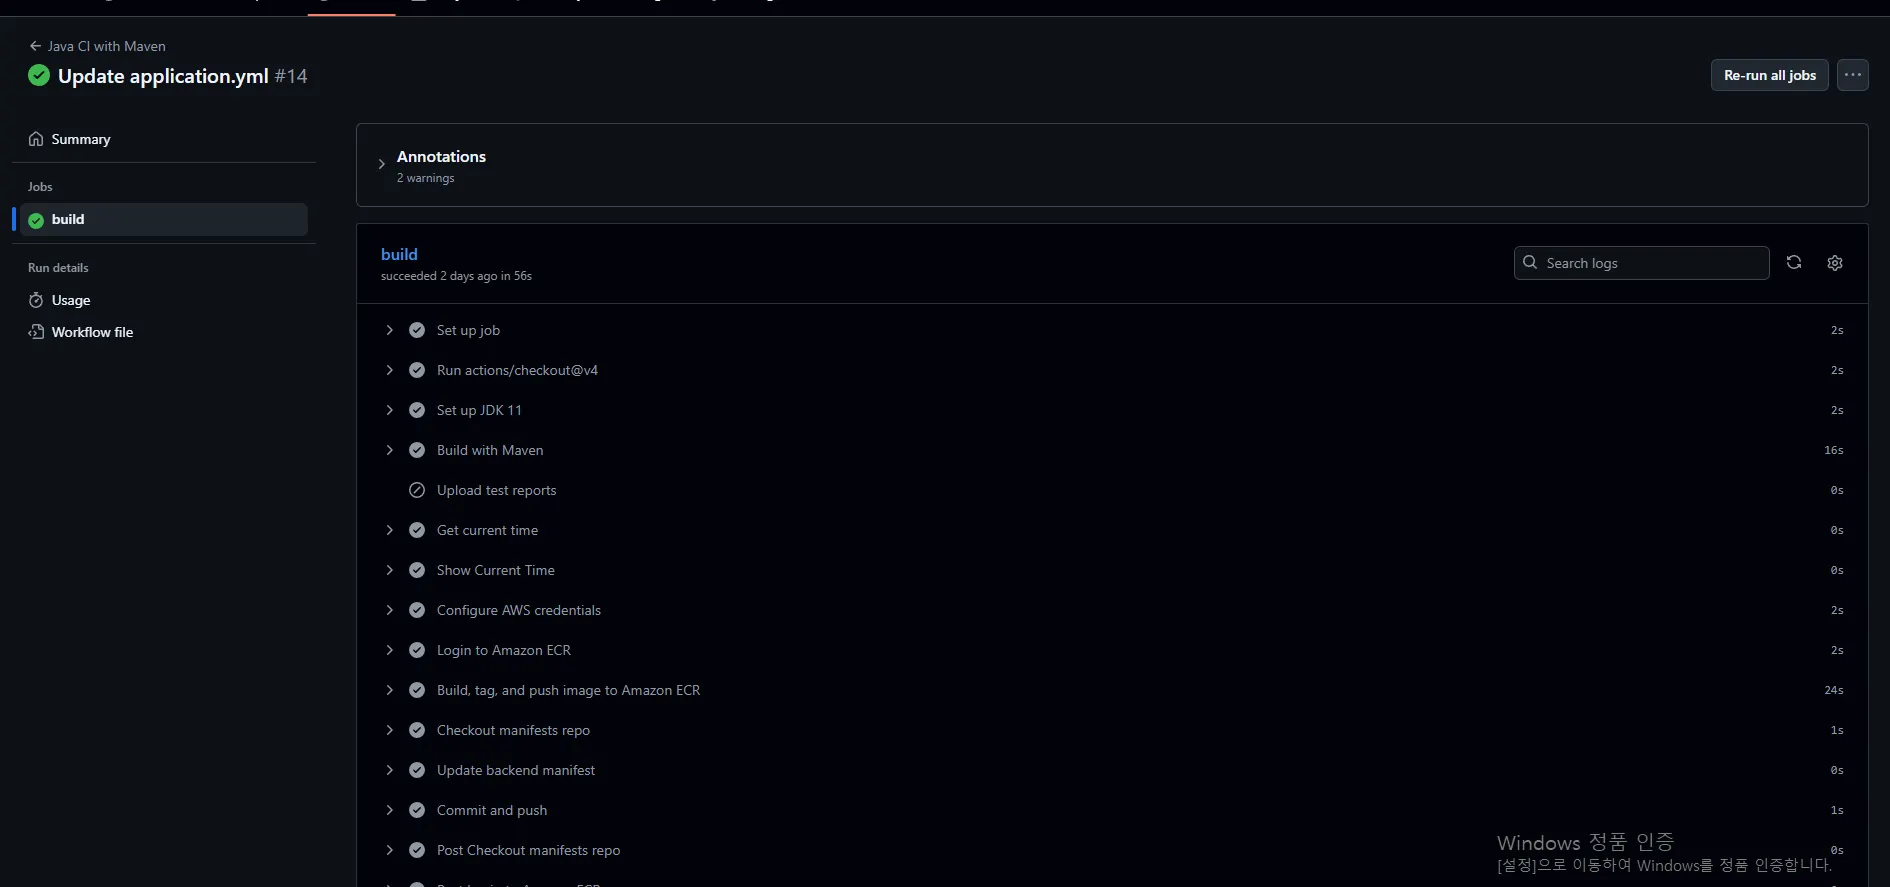
build 항목을 클릭하면 workflow file에서 - name 항목별 내용들이 빌드된 과정을 상세하게 볼 수 있다.
4. CI/CD 파이프라인
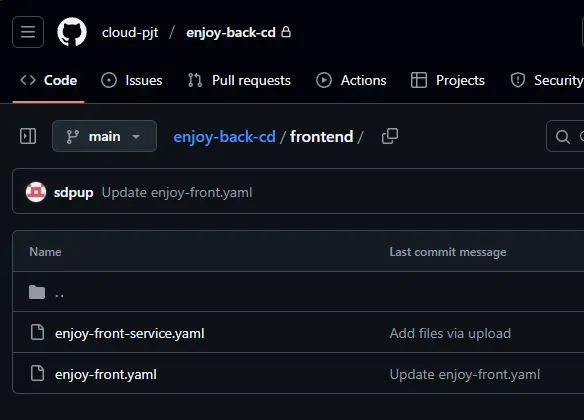
Manifest 용 Git repository 구성
Frontend
Backend
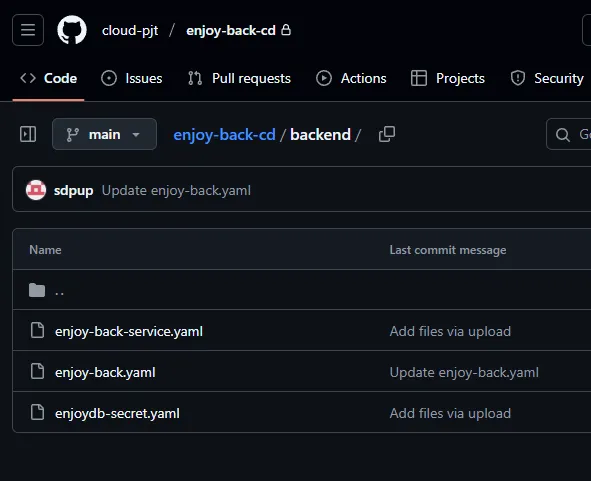
repository 별로 deployment, service 등 Pod 구성에 필요한 yaml파일을 미리 추가해주어야 한다.
2. workflow 구성 에서 제작된 workflow가 실행될 때 설정한 repository로 manifest push가 가면 CD가 이를 읽고 정해진 작업을 수행한다.
